Wednesday, September 18, 2013

The Rustic Grace Booth


    Wow this is Long overdue! A Month ago I moved my stuff downtown into an Amazing store called Town Square. I am so Excited to have a booth within their store. Keeping it filled has been a challenge... which is always a good one to have I guess :)

   Here are some Pictures:


  I have truly been Blessed with the talent I have. Up until 7 months ago I had never done anything like this before. I had never really used a saw, I had never worked with wood, I was only "crafty" with certain things. But Jesus has truly gifted me and I am learning new things time I work with something.

  I am just Thankful for the opportunity(s) He has given me to share this talent!!! Thanks for checking the pictures out and if you are ever in the Area Swing By Town Square in Douglas, Ga and check the Rustic Grace Booth out.


Halloween: Little Ghost Person


    I absolutely LOVE the Holidays! I am now in the process of getting Halloween stuff together not only for my Shop but for the Home as well!!! You know how it is... I've got to do a test try for myself before I make it for someone else ;)

  I remember growing up and my Great Grandma had this little Standing girl that leaned against the couch and looked like she was crying/pouting. I thought it would be cool to make a little Ghost Person to that affect.

And Here He is:


I thought He turned out Super Cute!!! All I used was some scrap wood ( pieces of 2x4's, 2x8, and some 1x4's cut in half) Along with some old pants and shoes the girls had out grown and Last but Not least an Old white sheet. 

I didn't really get any Pictures on a count of I wasn't sure how I was going to make Him or how He'd even turn out. But after a Trip for some more supplies I'll be posting a tutorial on how to make these cute little creatures :)

Thanks for Stopping by and Reading! 

Thursday, August 29, 2013

Junk to Fab

I Love finding Junky or tacky stuff and turning it into something Beautiful! Awhile back my Amazing Husband took me out Yard Sale'in and we came across this Tacky little Veggie holder. I wish I would have taken a Before picture but oh well...

Imagine this baby in a light wood color and Hunter Green trim with Ugly little painted veggie shape
things attached to the wire....

I'll do you one even better. Here is a picture of the little wooden painted veggie things:

With a little paint you can make anything Amazing! I Painted and Distressed is Awesome find and WaLa!!! What Cuteness!

Turn a Pallet into an Ottoman


    So Pinterest has inspired me to make an Ottoman from a Pallet. I have have never done upholstery projects and to be honest had my doubts how this was going to turn out.

Since every Pallet is different you may have to adjust things to fit the build of your Pallet.


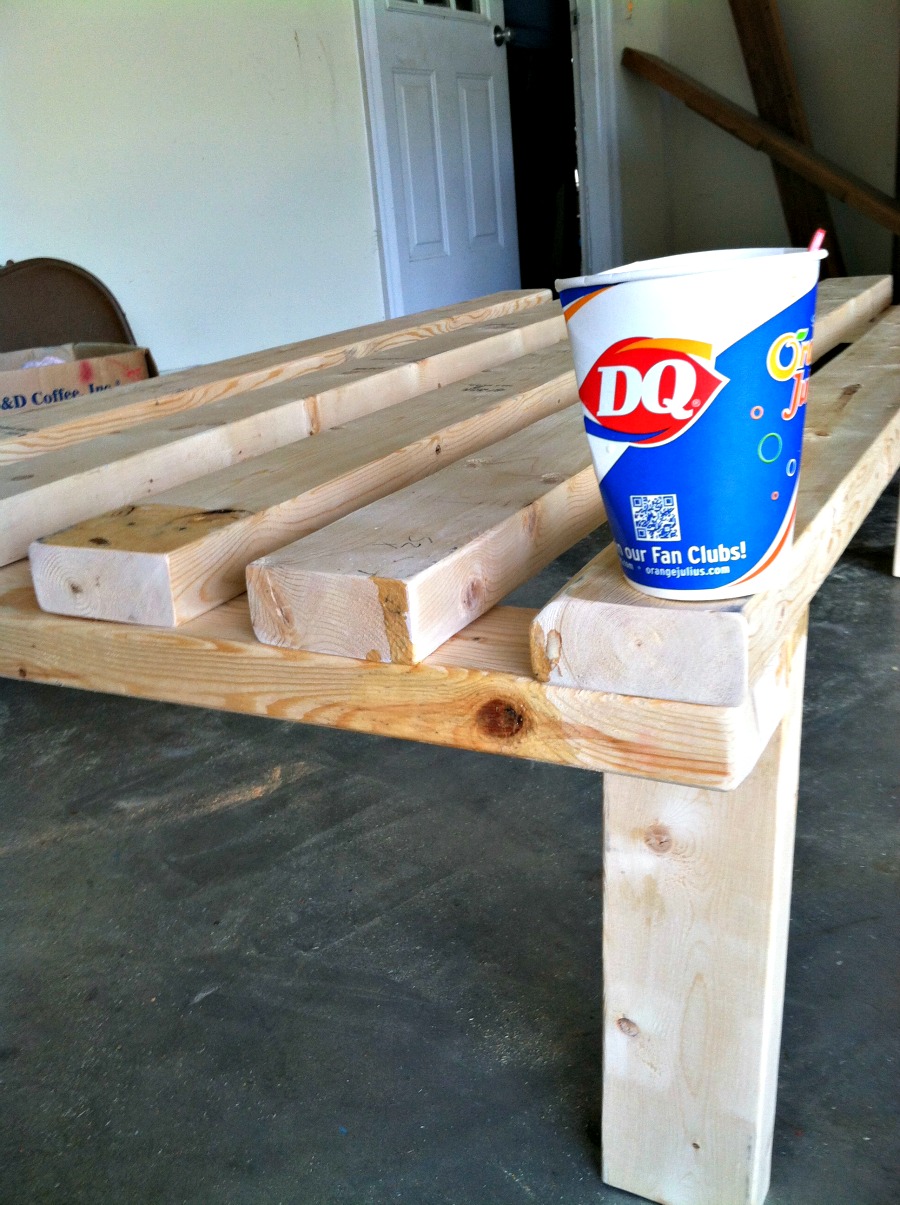
I stared by sawing of over hanging edges off the Pallet. It gave it a nice square shape. 


I wanted the pallet to have solid sides that way hen I placed my fabric and whatnot on; it would have something to hold on to. So I measured the hollow spots on the sides; Cut some scrape wood to fit the areas on all the sides.I used Glue and nails to put them in place.


So here is where it gets interesting...
When doing this project money was a little tight, So I knew I wouldn't have the money to go buy batting and foam and Fabric... so I improvised...

My kids had recently out grew a Foam Dora couch that folds out thingy. The cover was dirty and when I went to take it off to wash it I found the zipper was messed up. I tried to get it back on and couldn't. I decided to Repurpose that Wonderful Foam inside. It wasn't it the best shape but since this was just a test project I figured it couldn't hurt :)

I just a Elmer's Spray Craft Glue to secure the Foam.


I had just enough foam from the old Dora couch to do the top... 
I knew I needed something for the sides but knew I may just have to wait. Then to by surprise our church was throwing away some old batting they had used as snow at Christmas time.

Unfortunately I didn't get many pictures after this point so just use your imagination with me.   
Again I used the Elmer's Craft Spray Glue and placed the batting all around the sides.

And because I didn't have any "real" fabric on had I had to figure out what to do next. Awhile back I found a Beautiful King size sheet for $4 at a thrift store. 

Since this was going to be mine and kinda a test run if it didn't work out I decided to use the sheet. I looked up Ottoman Upholstery videos and how to's since I had never done anything like this before. I used a staple gun to secure.

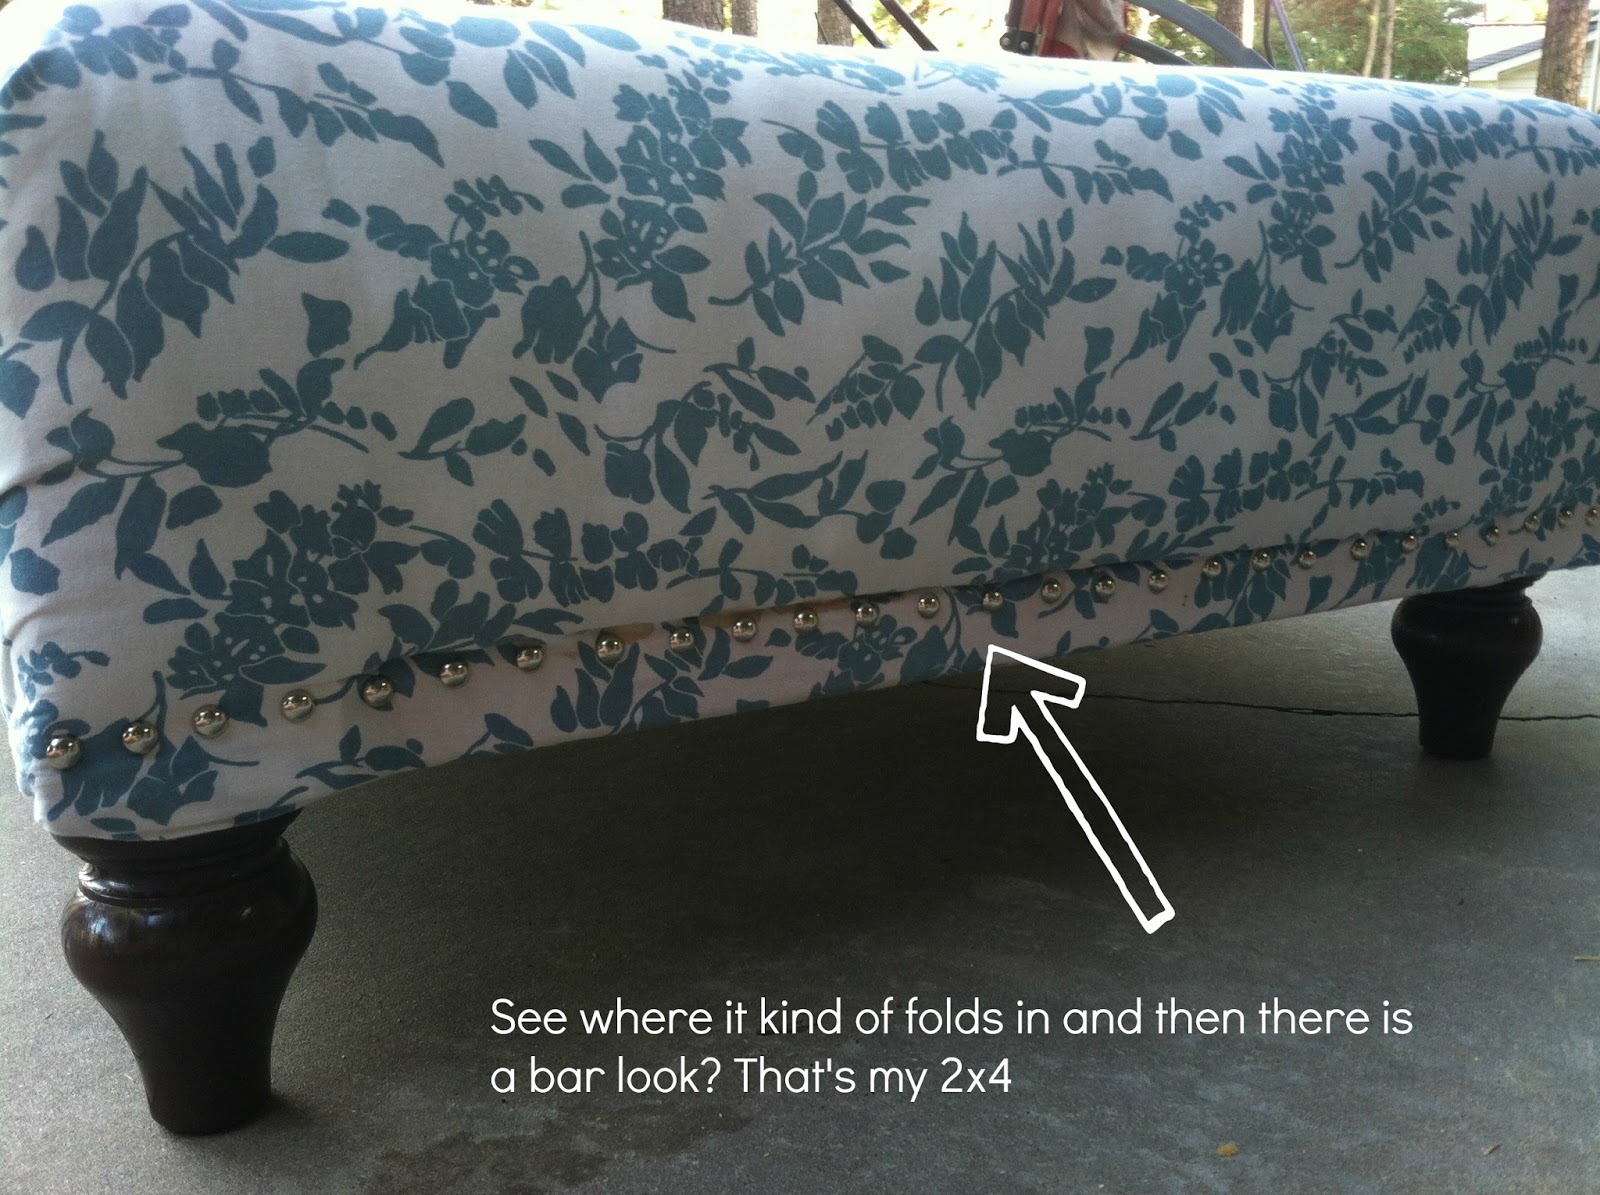
And although I don't have a picture of this after I had stapled the fabric around the sides I then cut 2x4's to put around the bottom at the edge of the pallets. Then I wrapped the fabric and stapled to the bottom. 


I found some screw in Furniture legs at a yard sale for .50 cent each. I attached them to the bottom. and last but not least I used furniture upholstery tacks to give it a little flare. 


It's not perfect but for a first try I thought it turned out Great! Hopefully this will inspire you to try something for the first time as well!!!

Tuesday, July 16, 2013

Diy Twine Wrapped Bottle Vase


     Let me start off by saying that I truly do have such a Supportive Husband. I don't know many men that would put up with Craft/pallets Everywhere... Our poor Garage, Closet and Part of our Kitchen Counters are Covered with my Odd and End stuff. Not to mention half the stuff I have sits until I feel "inspired" by something to do anything with it all. So on that note...

    A month or so ago I was in Hobby Lobby and and Noticed their Spring  Flowers were marked down 75%... So of Course I had to get them! And of Course they've just been sitting around :)

  We had some old Glass Soda bottles I saved for a rainy day and inspired by something I seen on Pinterest I decided to do my own thing with them.

Here is the Pinterest idea I saw:


And Here is what I did:


Super simple and Super Cute.... I just grabbed a bottle, twine and a little hot glue. I glued the starting end to the bottle and just wrapped until I was Happy. Then I glued the ending piece to the bottle. See, Nothing to it!!! Then I added some of those flowers I just had to have :)

Long Before God ever Created the Earth; He had you in Mind and He Loved (and Still Loves) You! - Ephesians 1:4

Monday, June 10, 2013

Our Family Vacation!!!

     It's been a crazy past few weeks!!! My Sweet and Beautiful little Boy turned one on Saturday May 25 and the following Monday we took the kids on a Much needed Vacation to Nickelodeon Hotels in Orlando!!! We had a Blast but I am so happy to be Home and get rolling again with Creativity!

    Vacation doesn't happen often for us and Boy was it great taking the Kiddos for the week swimming ,getting Slimmed, Meeting the Characters, being pied in the face, watching their Double Dare and other shows and all the other crazy stuff!!!!

   I am excited to be sharing some new Projects and New ideas!!!


Monday, April 15, 2013

Let's Build a Pallet Sofa Bench

   A while back I seen an Awesome project on Funky Junk Donna's Blog. It looked Great! So for a few months now the wheels in my head have been turning on how I could build my own! And here is is:


   I have Always wanted patio furniture... like real not cheapo plastic chairs... But I've never seemed to find that "right" look and Mostly because they are just way too expensive. Recently we were given a Bigger bed from a couple at church; My girls were still using Toddler beds so they got our Full size. So  then I just had two small mattresses lying around... with no purpose... UNTIL NOW!!! And I figured since they were water proof all the better!

I love the thought of being able to snuggle up and read or make my many to do list outside while drinking a or several cups of coffee :)

 So now that I had something to sit on....  (One of my girls old Crib/Toddler bed Mattresses)

It was time to build the Frame. While looking how to build this baby I read something great on Funky Junk Donna's Blog... and I quote "So I resolve to have an ugly garage and cool stuff."  I couldn't agree more! I'm sure the neighbors think I'm crazy or some kind of wood junk hoarder but It's worth it  :)

built my frame with 2x4's. I didn't go by any building blue print so I just measured to fit my Mattress/Cushion. It ended up being about 52 inches long.


I made my legs from 2x4's as well. I have no doubt there was an easier way to do the legs... But with limited resources and impatients I just went for it. 


(Don't you like the DQ cup? While I slave over this bench my 5 year old (Candice) was chillin with some ice cream hehe)


   Now the Back rest... I Love the look of the unevenness! It gives it such a unique and different look. All I did here was measure the height I wanted and started sawing and sanding different pieces at various lengths. I used a combination of 1x4's and 1x6's. I laid them now and cut a strip of 1x3 wood to secure all the pieces together.  


     To secure the back pieces together I used some Gorilla Glue and screws... At first I used some nails (since that was all I had at the moment but realized it wasn't as sturdy as I thought it was...ooopps) 

Before making my arm rest... on account of I had no idea how I was gonna do that yet... I took Longer screws and Screwed my back rest into the frame at the bottom.


Here's my arm rest: Not exactly Perfect but They work and I've got those babies so nailed, screwed and glued down they aren't going anywhere :)


While looking at yard sales a couple weekends ago we found this Awesome pillow... For only $1. It can't get much better than that! So I used it as a back cushion :)


   I really had no idea what I was doing so I just played around until I knew it wasn't gonna fall apart Haha! With the right tools and a little more patients it would have turned out a little better but I Love it! It's those imperfections that make this kind of stuff Perfect!!!! 

   The best part to me was the size. I Love having the Bigger seat. I can't curl up, Lay down, or whatever. Last night it was raining and Noah and I went out and put our new Sofa bench to use. It was Great. I sat Indian style with him in my lap and then we even laid down and watched the rain.  


Friday, April 12, 2013

Pallet Wood Photo Display


  I'm excited to share how to make your own Pallet Photo Display!!! It was so simple yet It Looks absolutely Amazing in my living room!!!

Step One: Gather Your Supplies :)

You will need:
Wood (Pallet or regular- just stain and WaLa!!!)
Clothes Pins
Gorilla Glue
Black Sharpie

I used 1x4 wood for mine. I got it from Lowes and stained it. You can make yours as Big or as Small as you like. But mine is 5 boards tall and Measures 23 inches Wide and 17 inches Tall.

Ok so First you want to get your wood to size. Measure it out however big you want to go- Below is the back of mine.


Now you need to secure it together. I didn't take a picture of the back of this one but below is a Picture of another wood sign I have made. It only has 4 boards but it's just to give you an idea of how to secure it:


Ok So now assuming you have your wood cut, Put together and Stained (If needed to)... Lets move on to the next step. Before Gluing your Clothes Pins on put the on the board with a Picture in them (I used 4x6 Photos) and line them when you like. Mark them with a Pencil once you figure out what you think looks best.

After I marked where I wanted my Photos to hang I Took my sharpie and Free handed {family} at the top. Then I glued those bad boys on!!! Keep in Mind when you use Gorilla Glue it will Expand... So only use a little. As tempting as it is Now you have to let your Creation Dry :o

Without the Pictures it doesn't look like much But once you get your photos on there Breathtaking!!! 


Once the Glue is Dried Add your Photos! And Remember this be creative... You can change up the wording... The Colors if the words and even clothes pins!!! 

See Simple yet Amazing!!!


Monday, April 1, 2013

Easter

So Easter has come and gone and the Kids started school back this morning. Yay!!! ;)

    But his past week has been a Tough one. Seems like everyone got sick at one point or another. And my poor Husband seems to have caught the worse of it. So while trying to play Super Mom, Being a good wife and taking care of the sickles I never made the time to do all the Cool Easter ideas I had running through my head. 

Yesterday It was just my Husband, my daughter Candice (5yr old), baby Noah (10 months), and Me. Eli spent Easter with his mom and Kaitlyn got to spend it with her dad. It was Noah's 1st Easter and I wanted to make it special. 

My Husband was still sick with some sort of virus and after Church it began to rain. We live so far away from all our family that it was just us... By the the afternoon I started struggling with feeling kinda like I let my kids down. Like I was a failure at being a "good" parent. Which is ironic that I wrote a facebook note one just the opposite... ( Here it is Check it out: https://www.facebook.com/notes/leah-reinhardt/identity-crisis/528113697240836 )

   But looking back it was a Great day!

 The Easter Bunny left Awesome Baskets that didn't break his wallet...


We went to Church and Celebrated the fact that Jesus defeated Death, Put sin in it's Grave and is ALIVE. We celebrated that because we Believe in the Finished work of the Cross; Jesus has covered us in His Perfection and we are Children of the King who stand Forgiven, Completely Loved, Valued, Righteous and Whole before God...

We dyed and decorated Easter Eggs...


And After Kaitlyn came home- the girls had a Silly String Fight and they hide Eggs from each other.


So despite they way I felt It was a Amazing day!
Know that if yesterday wasn't all you wanted it to be... If you weren't able to give the Biggest and Best Basket... If you couldn't spend all day doing "Easter Activities"... Know this: Who you are is not defined by your the things you couldn't give or didn't do with your children.
You are more :)