Thursday, February 28, 2013

Dr Seuss Who-ville Hair

   This week being Dr Seuss' Birthday Candice's Pre-school class decided to do a Who-ville Hair do Thursday. I had no idea what to do and when I looked online I then had no idea how to make her hair stand on top of her head!!

   And it certainly doesn't help that I'm not the most girly girl out there so fixing hair isn't one of my strong suits...

But here is my little Who


   After looking around on Pinterest I found that you can place a cup inside the hair and then pony tail it off at the top.

I decided to use a Styrofoam cup so it would be light weight and that way she wouldn't be ready to take it down so quickly. All in all it only took about 15- 20 mins... maybe less if I wouldn't have had to keep running around for stuff.

Here's a link to another site showing the Cup: http://doodlecraft.blogspot.ca/2011/11/cindy-lou-whohairdo.html

I used pipe cleaners and wrapped them around the braids... that way you can bend them and She could have fun twisting them about throughout the day. I also took some little pom pom balls and hot glued them to a bobby pin- Wish I wouldn't have done more but it ended up being a last minute thing. 

   Anyway that's my little Who-ville girl. She loved it and My 7 year old couldn't wait to become a Who tomorrow :)

Oh and don't forget the Hairspray! 


Today You are You! That is Truer than True! There is No one Alive Who is You-er than You!! 
 -Dr Seuss


Wednesday, February 27, 2013

DIY Wooden Box


  After making my tinted bottles I wanted something to put them in... So to Pinterest I went :)
It seemed pretty easy so I went to work.

First You'll need to gather supplies:

Brown and white Acrylic paint
Wood Glue
Small nails
1x4 board
Vaseline


First Cut your Boards to length

  It really just depends on the size you want. I just needed something big enough to put as a center piece on my table. My two side pieces are cut to 16 inches. The bottom and the sides I just had to play with. 


   And if your boards are cut perfectly it's ok. Mine were a little gappy... But once you sand around the edges and use wood glue they fill in a bit.


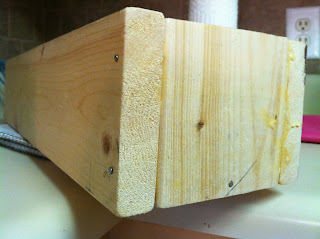
                   Next Glue your sides


       Then I used Wood Glue and Glued them together. I was scared that if it was sitting right side up the glue might make it stick to the table so I turned it side ways and let it dry.

  And with it turned on it's side I could move it around and make sure it was even


      After the glue dried I used small nails to make it more secure. I just put them around the edges that met.


                               Below is just showing the nails after I nailed them in


Now Paint

I used Brown acrylic paint to paint around the edges


    Now this may Sound silly But next I put a small amount of Vaseline on all the corners. This will help the paint peel and give it that rustic old look.

Although I have to warn that when I was sanding it- the paint where the Vaseline was wanted to peel off more than just be flaky. So you could probably just skip the Vaseline and just sand when finished.

  If you are wondering why it looks turquoise- ish... It's Not. I was just playing and was wondering if when I sanded it down.. if the turquoise color would show through.


After my Brown Paint dried I began painting it White. I ended up with about 2 1/2 coats of white paint.


   I let it sit until it was completely dried and then I Sanded it down. Remember I mentioned earlier that the Vaseline cause the area to peel more that the rustic look. So I noticed you could rub the area with your fingers and it did better than using a sanding block.

   And because I wasn't to sold on the peeling look I made from the Vaseline I took a little white spray paint and touched up my peeled corners. But hey make it as new or old as you like it. 

After it dried I took the sprayable modpodge and sprayed my box to make sure the paint was sealed in... with kiddos I never know if they might try to peel it off or whatever lol


Hope you were inspired in one way or another :)

Monday, February 25, 2013

DIY Tinted Glass Bottles


How to Create Tinted Glass Bottles...

    For Valentine's Day one of the things I did for my Husband was get Him his favorite Grape CRUSH drinks and tagged them with "I've got a CRUSH on You". So I made sure to get Him to keep his Bottles so I could Experiment... MUhahahaha :)

    I found a few different tutorials on Pintrest so this past Saturday I gave it a Try.... However my first round didn't really do to well... So the Good news is If you aren't happy with them just wash them out and start anew! 

Also after doing it the second time I wasn't to Sold on the Color ( Wanted a Darker Turquoise) So after they cooled I repeated everything. So they had 2 coats and were baked twice.

Supplies Needed:

  • Glass Bottles ( I just used the six left over from CRUSH pack)
  • Goo Gone (To clean labels and Sticky residue off)
  • Food Coloring
  • ModPodge
  • Water


I found a few different tutorials but I liked this one the Best:

Collect your glass (Bottles) and Clean 


   I had six of these CRUSH  bottles. They still had the sticky label on them so I peeled the labels off. They I used Goo Gone and wiped the sticky off; Then I washed them with Soap and Water.

Go ahead and Pre heat your Oven to 200 degrees


 Make your Mixture of Water, Modpodge and Food Coloring

   Ok so this part is kinda just experiment for the color you want. I wanted a Turquoise Color so I used Blue and Green. 

  I kinda followed the link above here. Just assuming I used 1 bottle I did 1 tablespoon of Water then mixed my food coloring into the water. For the turquoise color for every 2 drops of Blue I did 1 drop of Green. 

Go Heavy on the Food Coloring. After you mix those 2 together then add 2 tablespoon of Modpodge.
Now remember I had 6 bottles so I just added enough of everything to do six. So I used 6 tablespoon of water, 12 tablespoon of Modpodge and the first go round about 10 drops of Blue and 5 drops of 
Green.  

    Next...pour your mixture in your bottle...make sure it is completely coated with mixture. Then you are gonna wanna flip they upside down and let drain for 5 minutes. I put a piece of aluminium foil down and some paper towel on top of foil.


Time to Bake 


  I baked them at 200 degrees for 30 minutes.

  I took a cookie sheet lined it with aluminium Foil and then Parchment paper (so they wouldn't leak through). There were several times the Bottles fell over. I'm guessing the pan shifted due to the heat. But they were ok. I just picked them up and Put them back... using an oven mitt of course :)

  When the Timer was up I turned them right side up and let them cool. Because they were turned upside down (as one Tutorial said to do) there was gunk all around the neck opening.


    But No need to Worry. I just my dish sponge and a little water to scrub around the outside.


   Although I see no reason why you can't Bake them right side up. They do still drain a little while baking but it would just remain at the bottom around the rim; which still looked fine.


    And as I mentioned earlier they weren't the color I was looking for so after they cooled I mixed up a little more mixture... added some extra food coloring and Baked them again.


This time I baked them right side up. Still for 30 minutes.


I Let them Cool down and TADA!!!

   Remember the color will wash out. So don't use them for drinking out of, liquids and don't wash them. I plan on making a little wooden case thingy for them to sit inside. But the great thing is you can start over anytime you like :) Hope this helps and inspires you! 

   Here is one of the other tutorials I looked at. I tried this one first but the first time I tried it they didn't turn out right. But I love being able to read other takes on things as well. 

Welcome to my Blog :)

Ahhhh... Where to begin.

My name is Leah and I am a Pastor's wife and Stay at home Mom of 4. Being on a tight budget; the world of DIY has become my best friend. So Welcome... Enjoy... and keep checking back for new ideas on everything from Painting, Redos, Neat finds, Crazy thoughts, Pallet inspirations, Wood working projects, and other Great sites. To be Honest there's no Telling what else :

And just a Heads Up... Im new to the Blogging community so if you have any advice I'm all ears :)