After making my tinted bottles I wanted something to put them in... So to Pinterest I went :)
It seemed pretty easy so I went to work.
First You'll need to gather supplies:
Brown and white Acrylic paintWood Glue
Small nails
1x4 board
Vaseline
First Cut your Boards to length
It really just depends on the size you want. I just needed something big enough to put as a center piece on my table. My two side pieces are cut to 16 inches. The bottom and the sides I just had to play with.
And if your boards are cut perfectly it's ok. Mine were a little gappy... But once you sand around the edges and use wood glue they fill in a bit.
Next Glue your sides
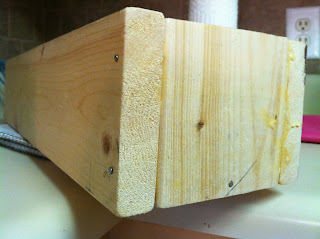
Then I used Wood Glue and Glued them together. I was scared that if it was sitting right side up the glue might make it stick to the table so I turned it side ways and let it dry.
And with it turned on it's side I could move it around and make sure it was even
After the glue dried I used small nails to make it more secure. I just put them around the edges that met.
Below is just showing the nails after I nailed them in
Now Paint
I used Brown acrylic paint to paint around the edges
Although I have to warn that when I was sanding it- the paint where the Vaseline was wanted to peel off more than just be flaky. So you could probably just skip the Vaseline and just sand when finished.
If you are wondering why it looks turquoise- ish... It's Not. I was just playing and was wondering if when I sanded it down.. if the turquoise color would show through.
After my Brown Paint dried I began painting it White. I ended up with about 2 1/2 coats of white paint.

I let it sit until it was completely dried and then I Sanded it down. Remember I mentioned earlier that the Vaseline cause the area to peel more that the rustic look. So I noticed you could rub the area with your fingers and it did better than using a sanding block.
And because I wasn't to sold on the peeling look I made from the Vaseline I took a little white spray paint and touched up my peeled corners. But hey make it as new or old as you like it.
After it dried I took the sprayable modpodge and sprayed my box to make sure the paint was sealed in... with kiddos I never know if they might try to peel it off or whatever lol
Hope you were inspired in one way or another :)


I love it! You are so creative! Love seeing how you make things!
ReplyDeleteYou are such an inspiration! Thanks for all you do with the girls too!
Love you,
Teena