Thursday, March 21, 2013

Easy Easter Snack


Happy Easter!!! 


  Easter is coming up fast and this is the Kids last week of school before Spring Break and then Easter. So I wanted to make a treat for the kids to take to school for their classes. The Schools here have made some new food rules and since you can't bring Candy or other snacks of that sort to school I had to come up with a healthier alternative....


Carrots!!!  


But Not just any carrots... Carrots made of Cheese Balls!


I seen where most people use Cake icing bags but when I looked our Walmart was out-  so Sad Face :( 

   But No Worries!! When I was looking through the Easter stuff I seen these Too Cute Carrot baggies! And They were only 97 cent for a bag of 15. 


    I ended up getting 3 packs to do two classrooms... So a total of $3. Then I had to get the Cheese balls to put in them. Looking I found out quickly I was not about to spend $5 a container when I needed enough to make 42 bags! After Looking everywhere I found these Great bags at BigLots for only $1 each.  Not to mention the Kids Loved them! 


(Sorry For the bad pictures lighting was not being my friend when trying to take pics of the bags)


It's Pretty Easy- Fill the bags with cheese balls and tie them off!! And since they already look like little carrots no need to buy green ribbon or anything! The Best thing is we made enough for 42 students with cheese balls left over and only $6 total invested :)


He has Risen! -Mark 16:6

And through His Resurrection and Your Belief in His finished work on the Cross- You no Longer have to define yourself by the standards of perfection and the world around you... But by Him and Who He says you ARE because of what He did for YOU! And He says though your Belief You are Beautiful, Perfect, Enough, Desired, Wanted, Valued, Important, Unconditionally Loved and Accepted  <3

Friday, March 15, 2013

DIY Framed Wooden Sign

How to Make a Framed Wooded Sign


Although it seems intimating it's actually pretty easy. 
There are the supplies needed:

  • 1x4 Wood
  • Saw
  • Spray Paint (for Frame)
  • Sanding Block
  • Wood Glue
  • Wood Stain (unless your wood is already the color you want it.)
  • Acrylic Paint


  I used Krylon Spray Paint; It did well but you can try any brand you want. Just make sure it's something that will stick! And I stained my wood with a Dark Walnut. 


The Frame was an old Wooden Frame I had lying around. I had tried to do something with it before- Bad Pinterest idea gone wrong. lol. So I had to sand the paint down  so I could actually work with it.

First Go ahead and Spray your frame. Let it Dry and recoat if needed. 

Next you will need to measure the inside of your frame. See how long your wood needs to be. And don't worry if your cutting isn't the straightest its ok. As long as it sits on the little notches the frames have you can use wood glue and filler to fill in any gaps.

After you have your wood cut Stain it. Let the stain dry over night. After it's dry you can sand and distress the wood if you like. Then use your wood glue and glue those jokers to the inside of the frame.  


When I was cutting the wood I noticed that I didn't have enough room using my 1x4. I measured and just cut a skinny piece of wood. It was not perfect. But the filler and glue helped fill the gap.


My OCD kicked in and I had to stain the back :)


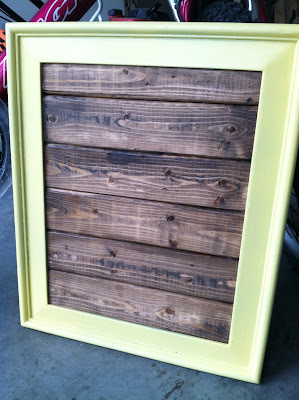
Here is the Front :


Now you can Paint anything you like in your Framed Wood sign. After all was said I distressed my frame just a little and sprayed a sealer over my acrylic paint. The Kids Loved it!  


Be creative and have fun


Thursday, March 7, 2013

DIY Wood Photo Transfer


How to Transfer your Photos to Wood:


The Other day I was looking at the pictures hanging on the Wall... They Brought back amazing memories we've had with our Kids... Except I noticed I didn't have any of my baby Son Noah. Its been 8 months since He was born. I then noticed I didn't even have any printed photos of him; Just Digital. 

And Being on the Budget we are I couldn't just run out buy frames and get Pictures developed. I remembered seeing this cool idea on Pinterest how you could transfer paper (printed from your computer ) photos to Wood. 

So WaLA! I got to work!

SUPPLIES NEEDED:
Wood Board
Modpodge
Photo Printed on regular paper

I used a 2x8 but other sizes work just as well. I had old scrap piece lying around. It had a little white paint on it but you don't have to paint yours.

I printed out a photo, Measured it on the board and cut it the size I wanted.


Now Place Modpodge on board and on your Printed Picture. Make sure to put Modpodge on the front
of your Picture. 


When Finished Covering Both the Wod and the Picture with Modpodge Place your Photo faceSide Down on the board. Position it the way you want and Let dry Overnight.


After its sat overnight dampen it (I sprinkled a little water over it). Now begin Rubbing gently with your fingers. The paper will begin to peel off. But don't rub to hard or with a hand sander because the photo itself will come off.


Let the photo dry. Then you will be after to see the left over paper residue that needs rubbing off. Like Below:


You may need to repeat this a couple times until you get the effect you desire. 
After you are finished rubbing let dry. If you use an 2x8 you can paint the outsides any color you like. I did mine White. After it is completely Dry put a coat of modpodge on it.

If you use a 2x8, they are free standing... No frames, no Stands Nothing required. Just set it wherever your heart desires! 


There you have it. How to make your own Beautiful Rustic Wood Portrait. And My kids Love these because they can hold them and play with them. Maybe need to make some photo blocks!! :)

And If you don't have the time or just don't want to yourself I would love to make one for you. Just check out my Shop on Etsy :)


Saturday, March 2, 2013

Easy DIY Thing 1 & 2 Costume


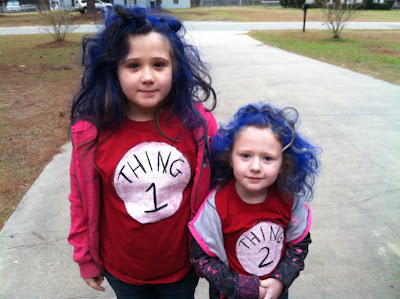
     This past week the kiddos school celebrated Dr. Seuss' birthday. So Friday they could dress up like a Dr. Seuss character; My girls decided they wanted to dress up as Thing 1 & 2 . And because I'm such a procrastinator we didn't get the stuff until Thursday evening. We went to Walmart and I guess because they are in between seasons they decided red wasn't a color to keep in stock. But I manged to find two red T-shirts in the Boys section and some Blue Temporary hair color spray at Walgreen's. I wanted to find red pants of some sort but couldn't... never the less the girls Loved their outfits!

  Being that we don't have tons to spend on costumes I had to make due with what we had. All in all we spent around $17 on Both their costumes. The shirts were less than $4 each, but the Blue hair color ended up being about $6 each.


Supplies Used:

Red T-shirt
White acrylic paint
Black acrylic paint
Various sponge and paint brushes
A circular shape to trace


First I used a coffee can to trace around to make my circle. Then I filled in the circle with white acrylic paint.  


I let the first coat dry then painted a second coat.


Then I traced around the circle with a white paint pen so it would look a little cleaner. and After the White paint was dry I traced around the edges with black paint (Fine line) and wrote with Black acrylic paint the word THING 1 on the first shirt and THING 2 on the second shirt....

Let Dry over night and TADA!!!! 

For the hair I just used hair spray, the Blue color spray and Lots of teasing!! At the Top I made a little Hair water sprout looking do to try and make their hair stand up more. When we were done it looked wild and messy.... 

And there you have it Easy Peasy simple and sweet DIY Thing 1 & 2 outfits.