Monday, April 15, 2013

Let's Build a Pallet Sofa Bench

   A while back I seen an Awesome project on Funky Junk Donna's Blog. It looked Great! So for a few months now the wheels in my head have been turning on how I could build my own! And here is is:


   I have Always wanted patio furniture... like real not cheapo plastic chairs... But I've never seemed to find that "right" look and Mostly because they are just way too expensive. Recently we were given a Bigger bed from a couple at church; My girls were still using Toddler beds so they got our Full size. So  then I just had two small mattresses lying around... with no purpose... UNTIL NOW!!! And I figured since they were water proof all the better!

I love the thought of being able to snuggle up and read or make my many to do list outside while drinking a or several cups of coffee :)

 So now that I had something to sit on....  (One of my girls old Crib/Toddler bed Mattresses)

It was time to build the Frame. While looking how to build this baby I read something great on Funky Junk Donna's Blog... and I quote "So I resolve to have an ugly garage and cool stuff."  I couldn't agree more! I'm sure the neighbors think I'm crazy or some kind of wood junk hoarder but It's worth it  :)

built my frame with 2x4's. I didn't go by any building blue print so I just measured to fit my Mattress/Cushion. It ended up being about 52 inches long.


I made my legs from 2x4's as well. I have no doubt there was an easier way to do the legs... But with limited resources and impatients I just went for it. 


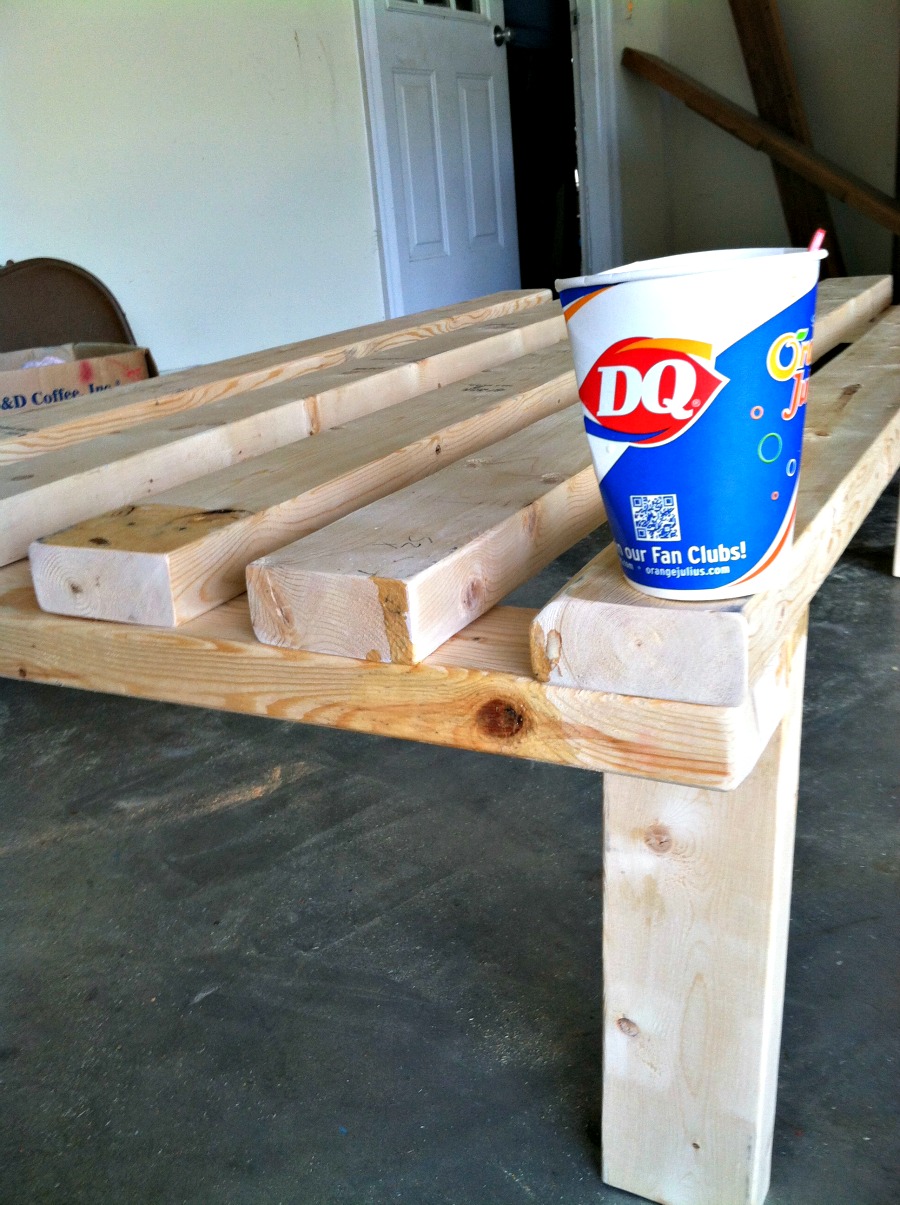
(Don't you like the DQ cup? While I slave over this bench my 5 year old (Candice) was chillin with some ice cream hehe)


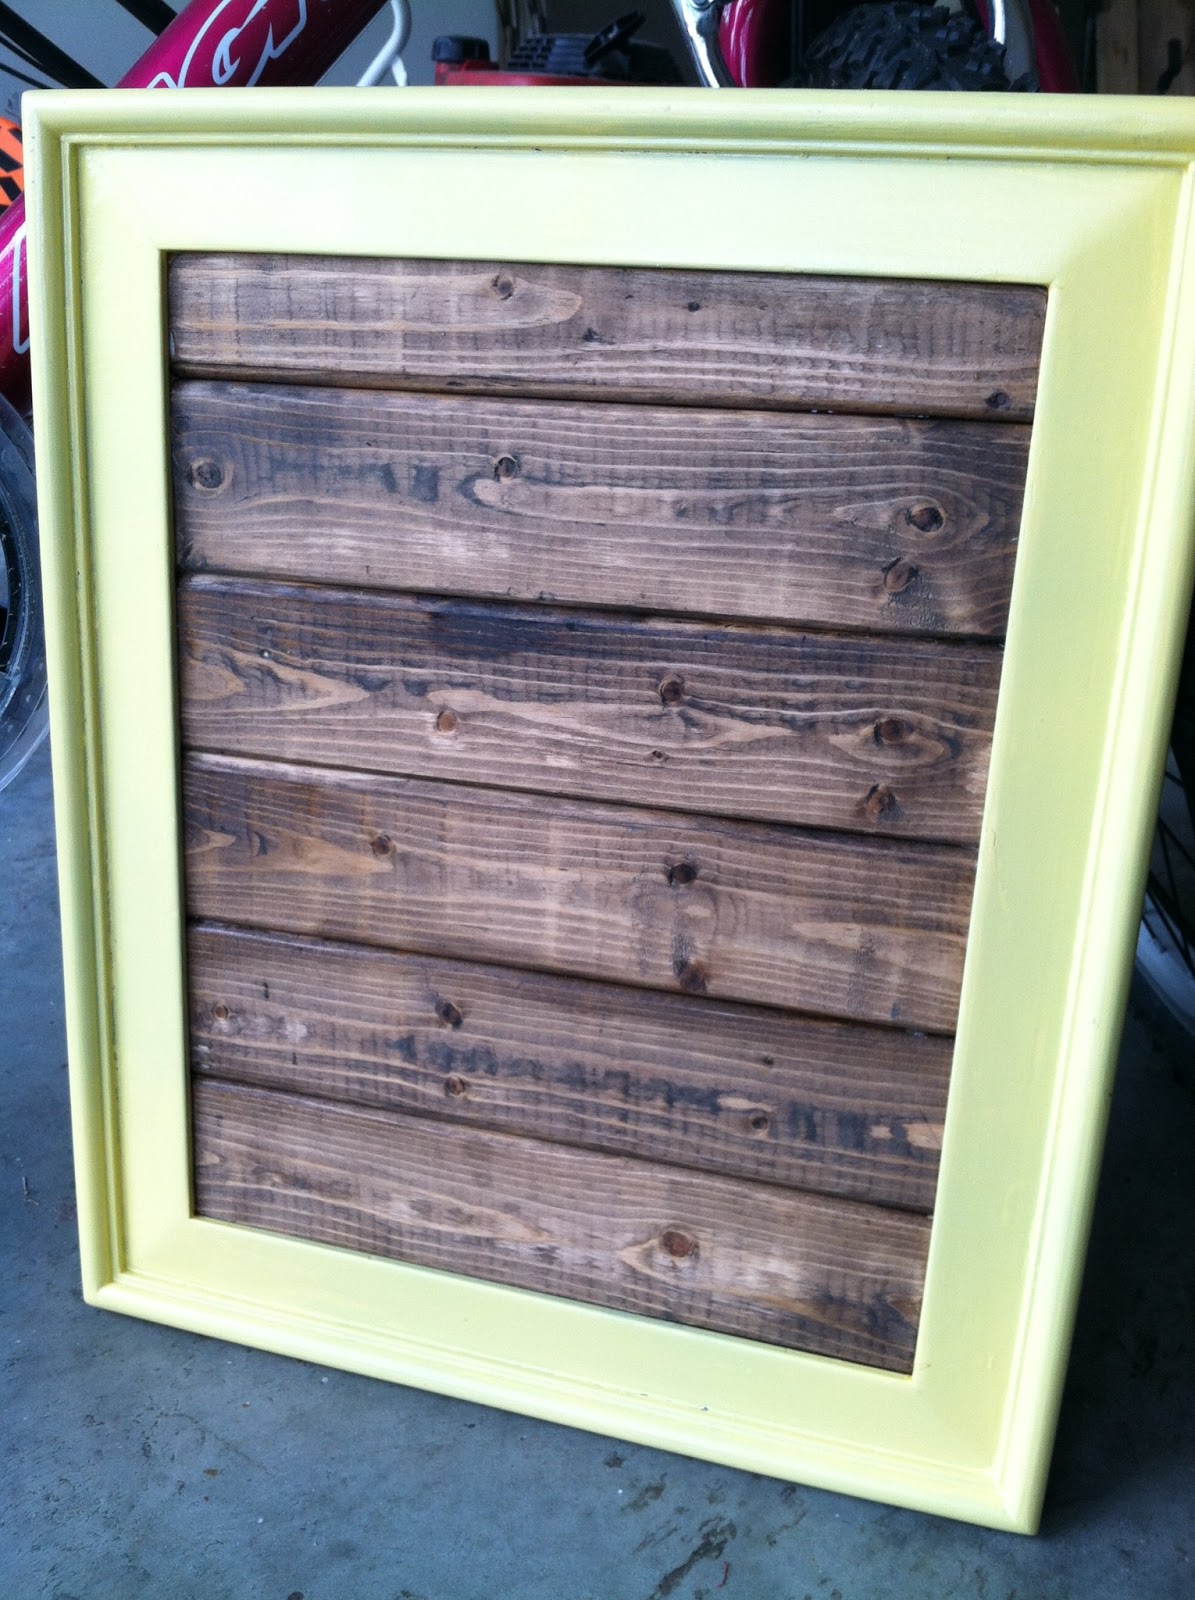
   Now the Back rest... I Love the look of the unevenness! It gives it such a unique and different look. All I did here was measure the height I wanted and started sawing and sanding different pieces at various lengths. I used a combination of 1x4's and 1x6's. I laid them now and cut a strip of 1x3 wood to secure all the pieces together.  


     To secure the back pieces together I used some Gorilla Glue and screws... At first I used some nails (since that was all I had at the moment but realized it wasn't as sturdy as I thought it was...ooopps) 

Before making my arm rest... on account of I had no idea how I was gonna do that yet... I took Longer screws and Screwed my back rest into the frame at the bottom.


Here's my arm rest: Not exactly Perfect but They work and I've got those babies so nailed, screwed and glued down they aren't going anywhere :)


While looking at yard sales a couple weekends ago we found this Awesome pillow... For only $1. It can't get much better than that! So I used it as a back cushion :)


   I really had no idea what I was doing so I just played around until I knew it wasn't gonna fall apart Haha! With the right tools and a little more patients it would have turned out a little better but I Love it! It's those imperfections that make this kind of stuff Perfect!!!! 

   The best part to me was the size. I Love having the Bigger seat. I can't curl up, Lay down, or whatever. Last night it was raining and Noah and I went out and put our new Sofa bench to use. It was Great. I sat Indian style with him in my lap and then we even laid down and watched the rain.  


Friday, April 12, 2013

Pallet Wood Photo Display


  I'm excited to share how to make your own Pallet Photo Display!!! It was so simple yet It Looks absolutely Amazing in my living room!!!

Step One: Gather Your Supplies :)

You will need:
Wood (Pallet or regular- just stain and WaLa!!!)
Clothes Pins
Gorilla Glue
Black Sharpie

I used 1x4 wood for mine. I got it from Lowes and stained it. You can make yours as Big or as Small as you like. But mine is 5 boards tall and Measures 23 inches Wide and 17 inches Tall.

Ok so First you want to get your wood to size. Measure it out however big you want to go- Below is the back of mine.


Now you need to secure it together. I didn't take a picture of the back of this one but below is a Picture of another wood sign I have made. It only has 4 boards but it's just to give you an idea of how to secure it:


Ok So now assuming you have your wood cut, Put together and Stained (If needed to)... Lets move on to the next step. Before Gluing your Clothes Pins on put the on the board with a Picture in them (I used 4x6 Photos) and line them when you like. Mark them with a Pencil once you figure out what you think looks best.

After I marked where I wanted my Photos to hang I Took my sharpie and Free handed {family} at the top. Then I glued those bad boys on!!! Keep in Mind when you use Gorilla Glue it will Expand... So only use a little. As tempting as it is Now you have to let your Creation Dry :o

Without the Pictures it doesn't look like much But once you get your photos on there Breathtaking!!! 


Once the Glue is Dried Add your Photos! And Remember this be creative... You can change up the wording... The Colors if the words and even clothes pins!!! 

See Simple yet Amazing!!!


Monday, April 1, 2013

Easter

So Easter has come and gone and the Kids started school back this morning. Yay!!! ;)

    But his past week has been a Tough one. Seems like everyone got sick at one point or another. And my poor Husband seems to have caught the worse of it. So while trying to play Super Mom, Being a good wife and taking care of the sickles I never made the time to do all the Cool Easter ideas I had running through my head. 

Yesterday It was just my Husband, my daughter Candice (5yr old), baby Noah (10 months), and Me. Eli spent Easter with his mom and Kaitlyn got to spend it with her dad. It was Noah's 1st Easter and I wanted to make it special. 

My Husband was still sick with some sort of virus and after Church it began to rain. We live so far away from all our family that it was just us... By the the afternoon I started struggling with feeling kinda like I let my kids down. Like I was a failure at being a "good" parent. Which is ironic that I wrote a facebook note one just the opposite... ( Here it is Check it out: https://www.facebook.com/notes/leah-reinhardt/identity-crisis/528113697240836 )

   But looking back it was a Great day!

 The Easter Bunny left Awesome Baskets that didn't break his wallet...


We went to Church and Celebrated the fact that Jesus defeated Death, Put sin in it's Grave and is ALIVE. We celebrated that because we Believe in the Finished work of the Cross; Jesus has covered us in His Perfection and we are Children of the King who stand Forgiven, Completely Loved, Valued, Righteous and Whole before God...

We dyed and decorated Easter Eggs...


And After Kaitlyn came home- the girls had a Silly String Fight and they hide Eggs from each other.


So despite they way I felt It was a Amazing day!
Know that if yesterday wasn't all you wanted it to be... If you weren't able to give the Biggest and Best Basket... If you couldn't spend all day doing "Easter Activities"... Know this: Who you are is not defined by your the things you couldn't give or didn't do with your children.
You are more :)

Thursday, March 21, 2013

Easy Easter Snack


Happy Easter!!! 


  Easter is coming up fast and this is the Kids last week of school before Spring Break and then Easter. So I wanted to make a treat for the kids to take to school for their classes. The Schools here have made some new food rules and since you can't bring Candy or other snacks of that sort to school I had to come up with a healthier alternative....


Carrots!!!  


But Not just any carrots... Carrots made of Cheese Balls!


I seen where most people use Cake icing bags but when I looked our Walmart was out-  so Sad Face :( 

   But No Worries!! When I was looking through the Easter stuff I seen these Too Cute Carrot baggies! And They were only 97 cent for a bag of 15. 


    I ended up getting 3 packs to do two classrooms... So a total of $3. Then I had to get the Cheese balls to put in them. Looking I found out quickly I was not about to spend $5 a container when I needed enough to make 42 bags! After Looking everywhere I found these Great bags at BigLots for only $1 each.  Not to mention the Kids Loved them! 


(Sorry For the bad pictures lighting was not being my friend when trying to take pics of the bags)


It's Pretty Easy- Fill the bags with cheese balls and tie them off!! And since they already look like little carrots no need to buy green ribbon or anything! The Best thing is we made enough for 42 students with cheese balls left over and only $6 total invested :)


He has Risen! -Mark 16:6

And through His Resurrection and Your Belief in His finished work on the Cross- You no Longer have to define yourself by the standards of perfection and the world around you... But by Him and Who He says you ARE because of what He did for YOU! And He says though your Belief You are Beautiful, Perfect, Enough, Desired, Wanted, Valued, Important, Unconditionally Loved and Accepted  <3

Friday, March 15, 2013

DIY Framed Wooden Sign

How to Make a Framed Wooded Sign


Although it seems intimating it's actually pretty easy. 
There are the supplies needed:

  • 1x4 Wood
  • Saw
  • Spray Paint (for Frame)
  • Sanding Block
  • Wood Glue
  • Wood Stain (unless your wood is already the color you want it.)
  • Acrylic Paint


  I used Krylon Spray Paint; It did well but you can try any brand you want. Just make sure it's something that will stick! And I stained my wood with a Dark Walnut. 


The Frame was an old Wooden Frame I had lying around. I had tried to do something with it before- Bad Pinterest idea gone wrong. lol. So I had to sand the paint down  so I could actually work with it.

First Go ahead and Spray your frame. Let it Dry and recoat if needed. 

Next you will need to measure the inside of your frame. See how long your wood needs to be. And don't worry if your cutting isn't the straightest its ok. As long as it sits on the little notches the frames have you can use wood glue and filler to fill in any gaps.

After you have your wood cut Stain it. Let the stain dry over night. After it's dry you can sand and distress the wood if you like. Then use your wood glue and glue those jokers to the inside of the frame.  


When I was cutting the wood I noticed that I didn't have enough room using my 1x4. I measured and just cut a skinny piece of wood. It was not perfect. But the filler and glue helped fill the gap.


My OCD kicked in and I had to stain the back :)


Here is the Front :


Now you can Paint anything you like in your Framed Wood sign. After all was said I distressed my frame just a little and sprayed a sealer over my acrylic paint. The Kids Loved it!  


Be creative and have fun


Thursday, March 7, 2013

DIY Wood Photo Transfer


How to Transfer your Photos to Wood:


The Other day I was looking at the pictures hanging on the Wall... They Brought back amazing memories we've had with our Kids... Except I noticed I didn't have any of my baby Son Noah. Its been 8 months since He was born. I then noticed I didn't even have any printed photos of him; Just Digital. 

And Being on the Budget we are I couldn't just run out buy frames and get Pictures developed. I remembered seeing this cool idea on Pinterest how you could transfer paper (printed from your computer ) photos to Wood. 

So WaLA! I got to work!

SUPPLIES NEEDED:
Wood Board
Modpodge
Photo Printed on regular paper

I used a 2x8 but other sizes work just as well. I had old scrap piece lying around. It had a little white paint on it but you don't have to paint yours.

I printed out a photo, Measured it on the board and cut it the size I wanted.


Now Place Modpodge on board and on your Printed Picture. Make sure to put Modpodge on the front
of your Picture. 


When Finished Covering Both the Wod and the Picture with Modpodge Place your Photo faceSide Down on the board. Position it the way you want and Let dry Overnight.


After its sat overnight dampen it (I sprinkled a little water over it). Now begin Rubbing gently with your fingers. The paper will begin to peel off. But don't rub to hard or with a hand sander because the photo itself will come off.


Let the photo dry. Then you will be after to see the left over paper residue that needs rubbing off. Like Below:


You may need to repeat this a couple times until you get the effect you desire. 
After you are finished rubbing let dry. If you use an 2x8 you can paint the outsides any color you like. I did mine White. After it is completely Dry put a coat of modpodge on it.

If you use a 2x8, they are free standing... No frames, no Stands Nothing required. Just set it wherever your heart desires! 


There you have it. How to make your own Beautiful Rustic Wood Portrait. And My kids Love these because they can hold them and play with them. Maybe need to make some photo blocks!! :)

And If you don't have the time or just don't want to yourself I would love to make one for you. Just check out my Shop on Etsy :)


Saturday, March 2, 2013

Easy DIY Thing 1 & 2 Costume


     This past week the kiddos school celebrated Dr. Seuss' birthday. So Friday they could dress up like a Dr. Seuss character; My girls decided they wanted to dress up as Thing 1 & 2 . And because I'm such a procrastinator we didn't get the stuff until Thursday evening. We went to Walmart and I guess because they are in between seasons they decided red wasn't a color to keep in stock. But I manged to find two red T-shirts in the Boys section and some Blue Temporary hair color spray at Walgreen's. I wanted to find red pants of some sort but couldn't... never the less the girls Loved their outfits!

  Being that we don't have tons to spend on costumes I had to make due with what we had. All in all we spent around $17 on Both their costumes. The shirts were less than $4 each, but the Blue hair color ended up being about $6 each.


Supplies Used:

Red T-shirt
White acrylic paint
Black acrylic paint
Various sponge and paint brushes
A circular shape to trace


First I used a coffee can to trace around to make my circle. Then I filled in the circle with white acrylic paint.  


I let the first coat dry then painted a second coat.


Then I traced around the circle with a white paint pen so it would look a little cleaner. and After the White paint was dry I traced around the edges with black paint (Fine line) and wrote with Black acrylic paint the word THING 1 on the first shirt and THING 2 on the second shirt....

Let Dry over night and TADA!!!! 

For the hair I just used hair spray, the Blue color spray and Lots of teasing!! At the Top I made a little Hair water sprout looking do to try and make their hair stand up more. When we were done it looked wild and messy.... 

And there you have it Easy Peasy simple and sweet DIY Thing 1 & 2 outfits.